Living This Creative Life

I have two favorite quotes. The first one is by Emile Zola, "If you asked me what I came into this world to do, I would tell you that I came to live out loud". I don't know who the second one is by, but it goes like this, "If you're not living on the edge then you might as well jump". Both of these sentiments sum up my personal philosophy of this experience we call life on earth. Enjoy!

Wednesday, June 22, 2011

Another Finished Quilt!


Good Morning All,

I know it's been a while, but I've been BUSY! It's a good busy but a bit overwhelming. I shot my second full length video last week. The first one was on embellishing art quilts and the second one was on fabric painting with hand made stamps. Soon I'll be carrying them both on my web site! I finished my color book and signed the Permission to Produce - so, it's off in Hong Kong being printed and I should have it in my hot little hands by mid Sept.
As I told you in my last entry, I'm trying very hard to get some new work finished for a show I'm hanging in Aug. This is another one that I recently finished. It is gelatin mono-printed then I quilted the hell out of it. The close-ups above show each of the three individual circle designs that I stitched in the negative space. It was very fun to do and I'm sooooooo glad it's finished. I've finished another one since this one was completed and am almost finished with another. I'll show you those in the next few days.
Hope you're all enjoying our beautiful summer,
Till Later,
Heather

Thursday, June 9, 2011

New Work


Good Morning All,

Today is my 4th wedding anniversary! Tom and I got married in our backyard on a lovely day just like today. Sunny, with a slight chance of showers - which I think is a great metaphor for marriage!

Here is my newest piece. I just finished it up this weekend after hosting a fabulous, two day, wildheatherdesigns.com open house. We debuted our new hand dyed fabrics and they were a big success.

I call this piece "She was Content" and it is the 3rd in my "She Was" series. The birds, leaves and sprigs are all done with stamps that I carved and I hand dyed both the background and border fabrics. The negative space behind the sprigs is quilted in a micro stipple and the border contains a poem/statement that reads, "Three little birds whispered sweet somethings in her ear and she knew that all was as it should be. Her course was steady and she was content." I used two layers of cotton/wool batting so that the quilting would really show up. If you click on either image you will be able to see a larger version of it.

I need to get about a dozen more pieces completed for a show that I will be hanging in August (yes, this August!) So, I'll be taking a break from new stitch-outs for a while, but I will show you all of the quilting that I get done along the way.

Also, I sent off the "permission to produce" for my new book yesterday. It was a huge relief to finally be done, but kind of a let down too - well, off to new things......

Till next time,
Heather

Friday, May 27, 2011

Block #98 in the Machine Quilting Challenge


Good Morning All,

Wow, what an amazing few weeks I've had!

My trip to Spring Quilt Market in Salt Lake City was very productive. I've added several new pans to the fire!

I've just finished the final editing of my color book and it should go to the printer on June 1st! It's such a long process but the book looks fantastic and I'm just so pleased with it. Thank you so much to all of you who have so graciously participated in it.

Here is a new design, I call it Giant Pea Pod. It looks somewhat difficult, but it's really pretty easy. Before you begin stitching it, click on the drawing to see it larger and doodle it out following the numbers. The numbers circle the outside twice so look carefully to avoid confusion. Use a contrasting thread so the the design really stands out.

Beginning on the lower, right stem, stitch a gentle curve up about 9"-10" and finish the line with a quarter sized swirl. Swirl back out and away to begin the opposite side of the pod. Stitch out and away then back in to form the first, smaller indention then stitch back out and form the curve of the middle 1/2 round then stitch back out and around to form the last round portion ending back at the stem.

Stitch up into the pea pod about 1/2" from the right hand side. Once you reach the tip, stitch back down again forming a 1/2"-3/4" wide channel. Once you reach the bottom of the channel, begin stitching small circles inside the channel. Once you reach the top again, stitch gentle, slightly curved triangles along the outer right hand side until you have reached the bottom. Trace back on the stem to the tip and stitch a new line about 1/8" away from the outer right hand side of the pea pod. Once you reach the inside of the swirl begin stitching the small parentheses shapes along the outer left hand side of the pod. Once you have reached the center of the first curve, stitch a swirl inside the curve of the pea pod then stitch back out a scant 1/8" away from the first line to make a very narrow swirl. Stitch more parentheses along the outside edge until you reach the center of the second curve and add a similar swirl on the inside of the pod. Do the same thing in the final inside curve of the pod then continue to stitch parentheses shapes along the outside edge all the way back down to the tip of the stem to complete the pod.

Using a thread that matches with the fabric, stitch the negative space around the pea pod in a small stipple or other fill stitch.
Hope you enjoy this design - I think it would be beautiful angled in a wide border or in setting triangles or squares.
Till next time,
Heather

Sunday, May 8, 2011

Block #97 in the Machine Quilting Challenge


Good Evening All,

I've been working hard on preparing for Spring Market. Going to promote my new book, Color & Design as well as the old book, Fabric Embellishing. I'll be doing School House Sessions, some short classes and demos in my publisher's booth. I'll be looking for more goodies for my web site too!. I leave next Wednesday and get back the following Tuesday - so I'll have a week with no new posts. But when I get back I'll fill you all in with my market details.

Today's new block features a combination of several designs that we have stitched before plus a few new little additions. Click on the drawing above and view it larger to get a good idea of how to start. I highly suggest doodling this one out a few times before you start it. Try it in different sizes too.

Beginning at the lower right hand corner of your block stitch the long outer leaf then stitch the smaller leaf inside it. Once you reach the lower end on the second side of the innermost leaf, begin stitching small circles inside it. Make sure that all of the circles touch each other and to vary their sizes too.

Once the circles have been stitched to fill the innermost portion of the leaf, stitch from the tip of the smaller leaf up to the tip of the outer leaf and stitch a tear drop on the top then stitch your first feather on one of the sides. Once the feather is complete, stitch back up along the side of the leaf about half the width of the feather and stitch the inner design into the middle of the feather. Once you have completed it, stitch back down and position yourself so that you can stitch the next feather. Continue stitching feathers then filling them with the decorative design until you have completed the first side. Now, stitch back up along the opposite side of the large leaf then back down as you make filled feathers. Alternately, you may stitch all of the feathers first then go back in ad add the decorative design inside them.

Once the entire feathered leaf is complete, echo around it and make a pointy curly-q on the middle top of each feather as shown.

I stippled the remaining portion of the block with a large stipple using the same color thread. Note how the lovely feathered leaf gets somewhat lost among the stippling - in my next entry, I'll show you a better way.

Hope you enjoy this design - I know I loved stitching it.


Till next time,
Heather

Monday, May 2, 2011

Block #96 in the machine quilting challenge


Good Morning All,
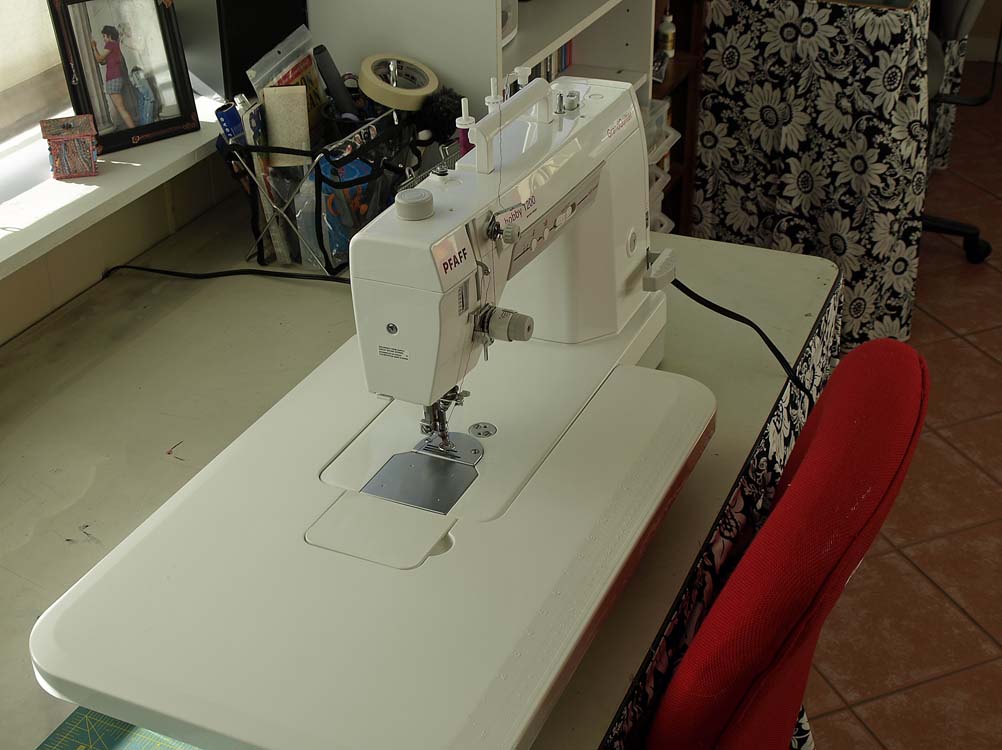
I wanted to show you all a photo of my beloved quilting machine. This is what I now do all of my machine quilting on. It is a Pfaff (yes, a pfaff!) Hobby Quilter, the baby sister to the Grand Quilter. It has a 9" opening and stitches faster than light (I usually stitch at much lower speeds!) I love this baby - she works hard, never complains and likes every brand and weight of thread that I throw at her.

Here is another new design. It is comprised of two elements that we've already done; a single sided feather and echoing. Click on the drawing to see it larger and follow the arrows for a better graphic. Doodle it out before you start stitching too.

Beginning near the center of your block, stitch a long line with a slight curve at the beginning and end it with a swirl. Keep the lines of the swirl about 1/2" apart. Once you are in the center of the swirl, begin making half heart shaped feathers along the outside of the swirl and all the way down the spine to complete the single sided feather.

Once you are out of the feather, stitch back up the side that doesn't have feathers on it keeping the stitch line about 1/4" away from the spine. When you reach the feathers on the swirl, stitch around them too. Keep stitching all the way around the half feather keeping the stitch lines about 1/4" apart until you have circled the feather twice. Stitch back up along the spine then stitch out and away and form another half feather. Echo it twice and fill in any space between the two with more echoing. Keep adding new half feathers and echoing them and filling in the spaces in between until you have filled the block. Strive to keep all of the stitching lines 1/4" apart.

Hope you enjoy this one - it's one of my favorites - I love all of the tactile texture it imparts.

Till next time,

Heather

Sunday, May 1, 2011

Appologies and a New Design # 95


Good Day All,

My apologies for not adding a new design in so long. My business is keeping me so busy right now that I'm not sure if I'm coming or going! Plus, I've been without a lap top for about a month due to a little mishap with a glass of red wine. But, I took some time earlier this week to stitch out a few more new designs. I call this one Nautilus. Click on either image to see larger.

This stitch out is essentially like a swirl. You'll probably want to doodle it out before you begin stitching.

To start, beginning near the center of your block stitch a swirl beginning from the outside and stitching in. Make the swirl about 1 1/2" wide. Once you reach the center of the swirl, begin making wavy lines from one side of the swirl over to the other side and back again. Travel along the inside of the swirl about 1/4" and stitch another line from side to side. Continue stitching these lines from side to side keeping them about 1/4" - 1/3" apart until your reach the end of the swirl. Stitch out and away from the first swirl and stitch a second swirl that is slightly smaller than the first one. Again, stitch from the outside in to the swirl then stitch back out of the swirl as you stitch the lines from side to side.

Continue adding more swirls of various sizes, nestling new swirls into previously stitched ones and varying the directions of the swirls too.

Thanks for coming or coming back. I promise new designs more regularly and I'll be writing about other stuff too!

Till next time,
Heather

Monday, April 4, 2011

Blocks #93 & #94 in the Machine Quilting Challenge


Hi Everyone,

I'm so sorry that it has taken me so long to get back here.

It's been a zoo! I've been working hard the last several weeks to get my web site back up and running and to get classes scheduled too. If you want to know more about it all, visit my site at wildheatherdesigns.com. So, as an apology, here are two new designs.

Both designs are based on the gentle curve or arc and both require you to mark the surface with squares. I marked mine with a Hera marker - remember, it's a sharpened beveled edge piece of plastic that just makes a crease. Anyway, for the first design on the left, I marked my block with six equally sized squares vertically and horizontally. Each square is 1 1/2". These can be a little confusing so you definitely should doodle them out before you attempt stitching.

The first set of gentle arcs moves diagonally across the center of each marked square and across the center of the block. Begin in the bottom left corner and stitch a gentle arc ending in the opposite upper right hand corner of the marked block. Next do the same in the next block that is one up and one over. Keep making gentle arcs from corner to corner in subsequent squares moving diagonally toward the upper right. Do the same thing back down, in the same squares only this time make the arcs on the opposite side of the first arcs and make them curve in the opposite direction sort of forming a pea pod shape.

Using the edge of the block, skip the next diagonal row over and move up to the following row and stitch the same pea pods . Stitch every other row of diagonal squares in the same manner, all stitched with a pea pod shape across their middles that moves in the same direction. Now, do the same thing, in the remaining rows, but stitch the pea pods in the opposite direction, beginning from the bottom right and stitching up to the upper left. This will yield a flower like design.

Next, you will add smaller, thinner pea pod shapes that curve around each of the sides of the squares in all of the rows. Simply begin on one row and stitch a gentle arc above the marked line on one side of the square then on to the next square to do the same until that row has half pea pods all along the top side of the line. Go back in the opposite direction and stitch gentle arcs along the bottom side of the marked lines, completing the pea pod shapes. Do this on all the marked lines both vertically and horizontally thus completing the smaller petals of the flower shapes in each block.

The second block was marked the same way as the first, (6) 1 1/2" squares in each direction.
I haven't quite figured out how to do this one without knotting off and or traveling along the edges. Consider a set of four squares to be a complete unit. The middle is where the corners of all four squares meet up. The first portion of the design will be stitched in the top two squares of the unit. Begin stitching a gentle arc from the upper left hand corner down at an angle toward the the line that divides the two upper squares. Aim to stitch trough that line about 2/3 the way down from the top of the squares and curve into the second square forming a tear drop that peaks right at the center of the four squares then curve it back up again and into the first square and take it back up so that it crosses over where it first entered the second square and continue stitching up into the upper right hand corner of the second square. You will repeat this motion three more times to complete one floral shape that fills one 4 square unit. Do it a second time using the right hand square and the one below it. Do it a third time in the two bottom squares then do it a final time in the two left side squares. Each time, try to stitch equally sized tear drops near the center of the 4 square units.

You can also try to do the stitching in rows, but I found that once I finished a row in one direction that I still had to travel or knot off to go in another direction. It's all worth it however, because it's a great design.

Hope you enjoy these, I'll be back on track now that I've caught up - at least I hope so!
Till next time,
Heather